


PROJECT
3D Printed Modular Bag Handles
If you’ve ever wondered how 3D printing can be applied to a textile project or maybe asked yourself, “what can I use for bag straps?” as you put the finishing touches on your handbag design - then you may be interested in this exploration on 3D printing handbag handles.
In this video we explore prototype design, a few ways to attach the handles to the bag, and cover the benefits of embedding magnets in your handles.
Reference files can be found in the Materials Reference accordion at the bottom of the page plus an announcements sign-up form.
Getting Started
With the 3D printed handles just being a component of the overall project, there were some details to communicate within this design partnership. To get started we needed to pull together the initial handle specs, such as size, shape, and colors.

Size of the handles
When deciding on the size of the handles, consider the possible limitations of your 3D printer and the style of bag they will go on.
First we looked at the 3D printing process & accounted for any limitations of the specific printer itself. We decided to keep the designs simple and were deliberately conservative to limit the number of variables early in the testing.
To note - we did encounter some unexpected issues during the printing process and the conservative approach allowed us to troubleshoot, learn, and revise our approach much quicker. You can check out our full exploration on magnet troubleshooting here.

Next, we decided on the size of the handles, width and height, based on the style and size of our bag. In this prototype, we chose a tote style bag, which has a wide opening at the top.
Since our handles are sturdier, we were able to make them as wide as 8.5 inches (~21.5 cm). Keeping the measurements even from the center of the purse.


Measure for the opening
The other component of handle size are each of the openings on the handle - there is the handle drop length & the attachment opening.
The handle drop length is the distance from the top of the handle or strap to the top edge of the bag.
This measurement helps determine if the handle is suitable for carrying over your wrist, lower arm, shoulder, or cross body. The right opening is essential on a purse for a comfortable carrying experience.
There are some typical lengths you can reference, but since personal comfort also depends on other factors like your height, bag weight, and bag style you should take some measurements if you are making a bag for yourself. Especially if the handle will be fixed, and not adjustable, like our 3D printed handles.
While fixed 3D printed handles are more interested in drop length, we put together a comprehensive reference that includes measuring for strap length as well. Which is needed for material, leather, or webbing straps. You can check out the full diagram for how to measure your strap length & drop length along with considerations for choosing your ideal drop length here.

Shape
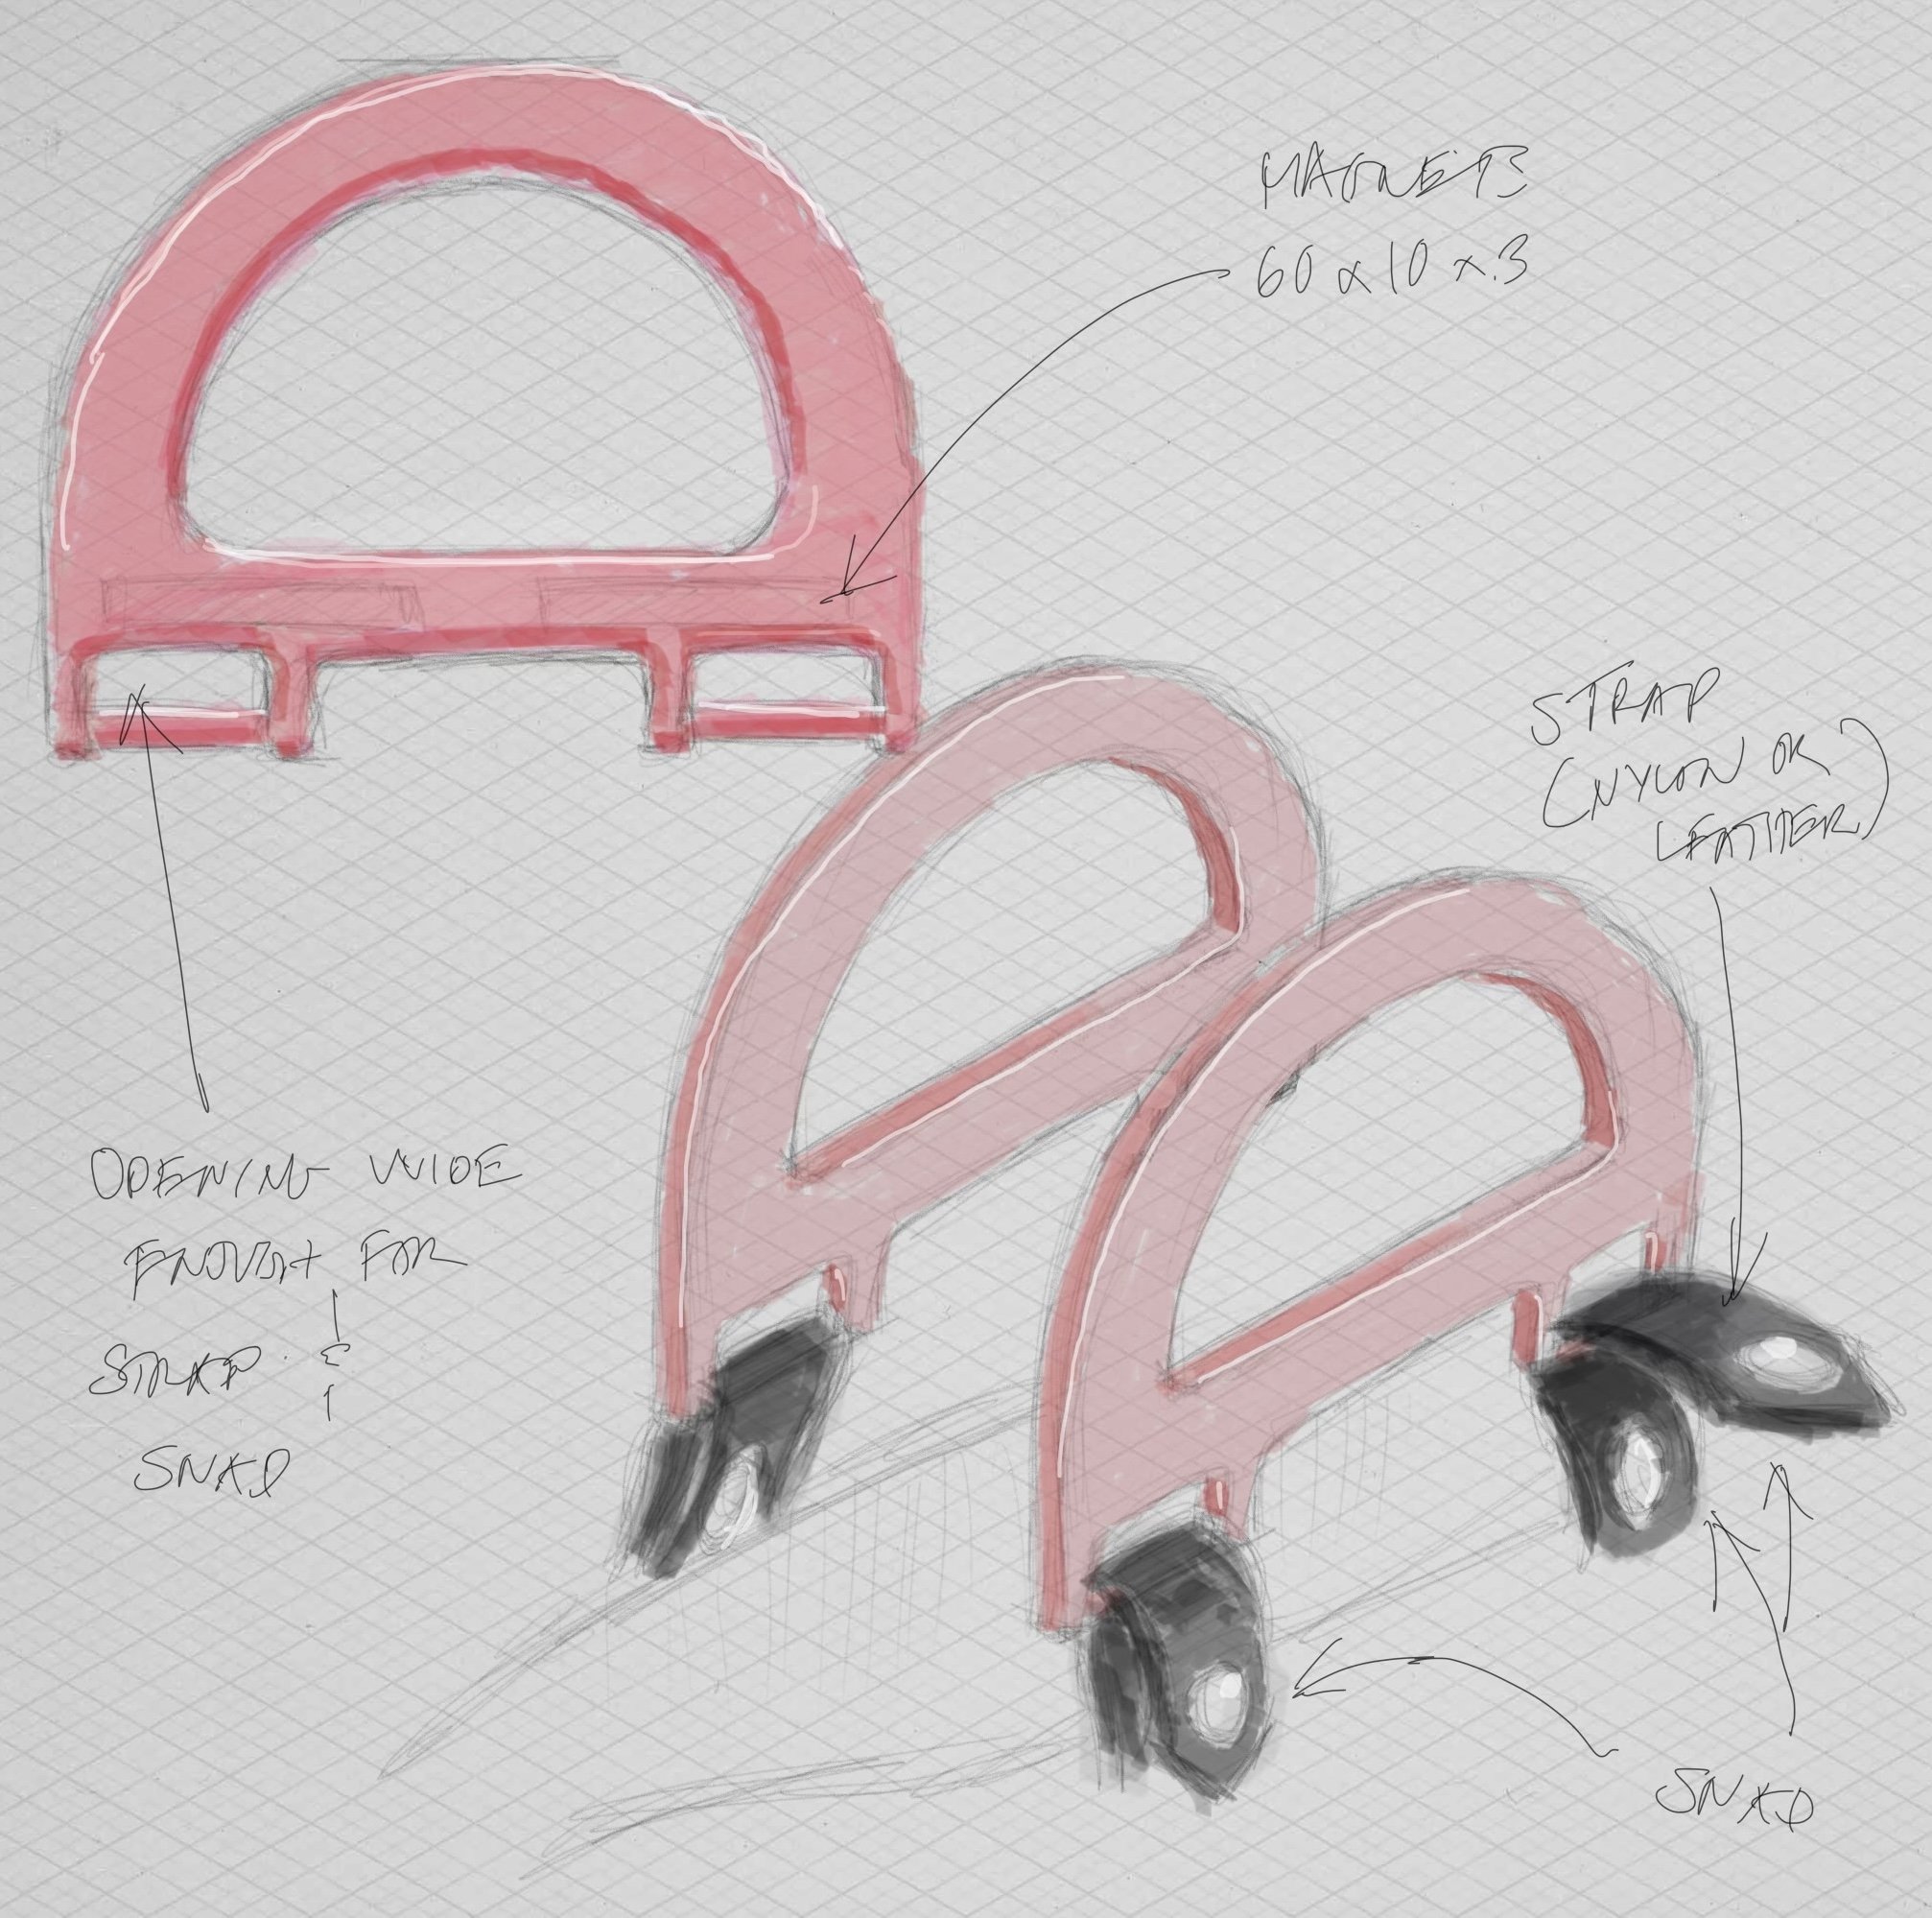
Getting into the shape of the handles we wanted to stay close to basic shapes so we could retain an ease of edits and adjustments in our prototypes. We modeled these in Shapr3D and took care not to introduce too much initial complexity.
The initial designs had a basic, rectangular shape on the outside and a simple stadium shaped cutout, with radiused edges for the handle - which was made large enough for most hands to carry. This shape style also provided ample space in the design to place the handle attachment openings and magnets.
A later iteration explored an egg-shape style, which increased the drop length of the handle so it could easily fit over your wrist or lower arm.

Color
We wanted a uniform aesthetic across the entire purse design, blending the handle color to the purse material. We explored both color matching and tone variance.
As you probably already know, the perceived color of the filament on the roll to what you get when it is printed can be different because of the way light interacts with the layer lines or surface pattern.
To be sure we get a color we want, we do a test print and create a small chip to reference.
Attaching The Handles

When it comes to attaching your handles to the purse, there are a variety of materials you can use.
The same material as the purse
Nylon or webbing straps
Crochet or macrame
Leather
Whichever material you choose to use, know that it has a direct effect on the modeling process of the handles.
Not only does it inform the size of the attachment opening it can also have a direct correlation to the overall thickness of the handles.
This is because the rods that the material will wrap around will need to be a minimum diameter so they are strong enough to handle the weight of the bag when it is loaded up.

To get the correct attachment opening size, measure the width and thickness of the attachment material, and in some cases with any additional hardware that would pass through. Then increase that measurement by a minimal amount so the attachment material can easily pass through the openings.
In our example, we measured by millimeters. If you add 1 to 2 mm to the measurement of the attachment material it will give enough space for the material to pass through while still keeping the openings slim so they don’t overpower the bag.
Tip - Grab yourself a pair of Calipers and make a smaller mock-up of your material to pass through the openings. The calipers will measure it with precision, which is needed when working with 3D printing & Shapr3D.

Unlike many purse handles you can buy off the shelf today, we wanted to use embedded magnets in ours, which gave us a seamless look when the handles are closed.
To achieve this, we carved out cavities at the bottom of the handles, which meant we also needed to account for the size of the attachment material in the proportions of those cavities.
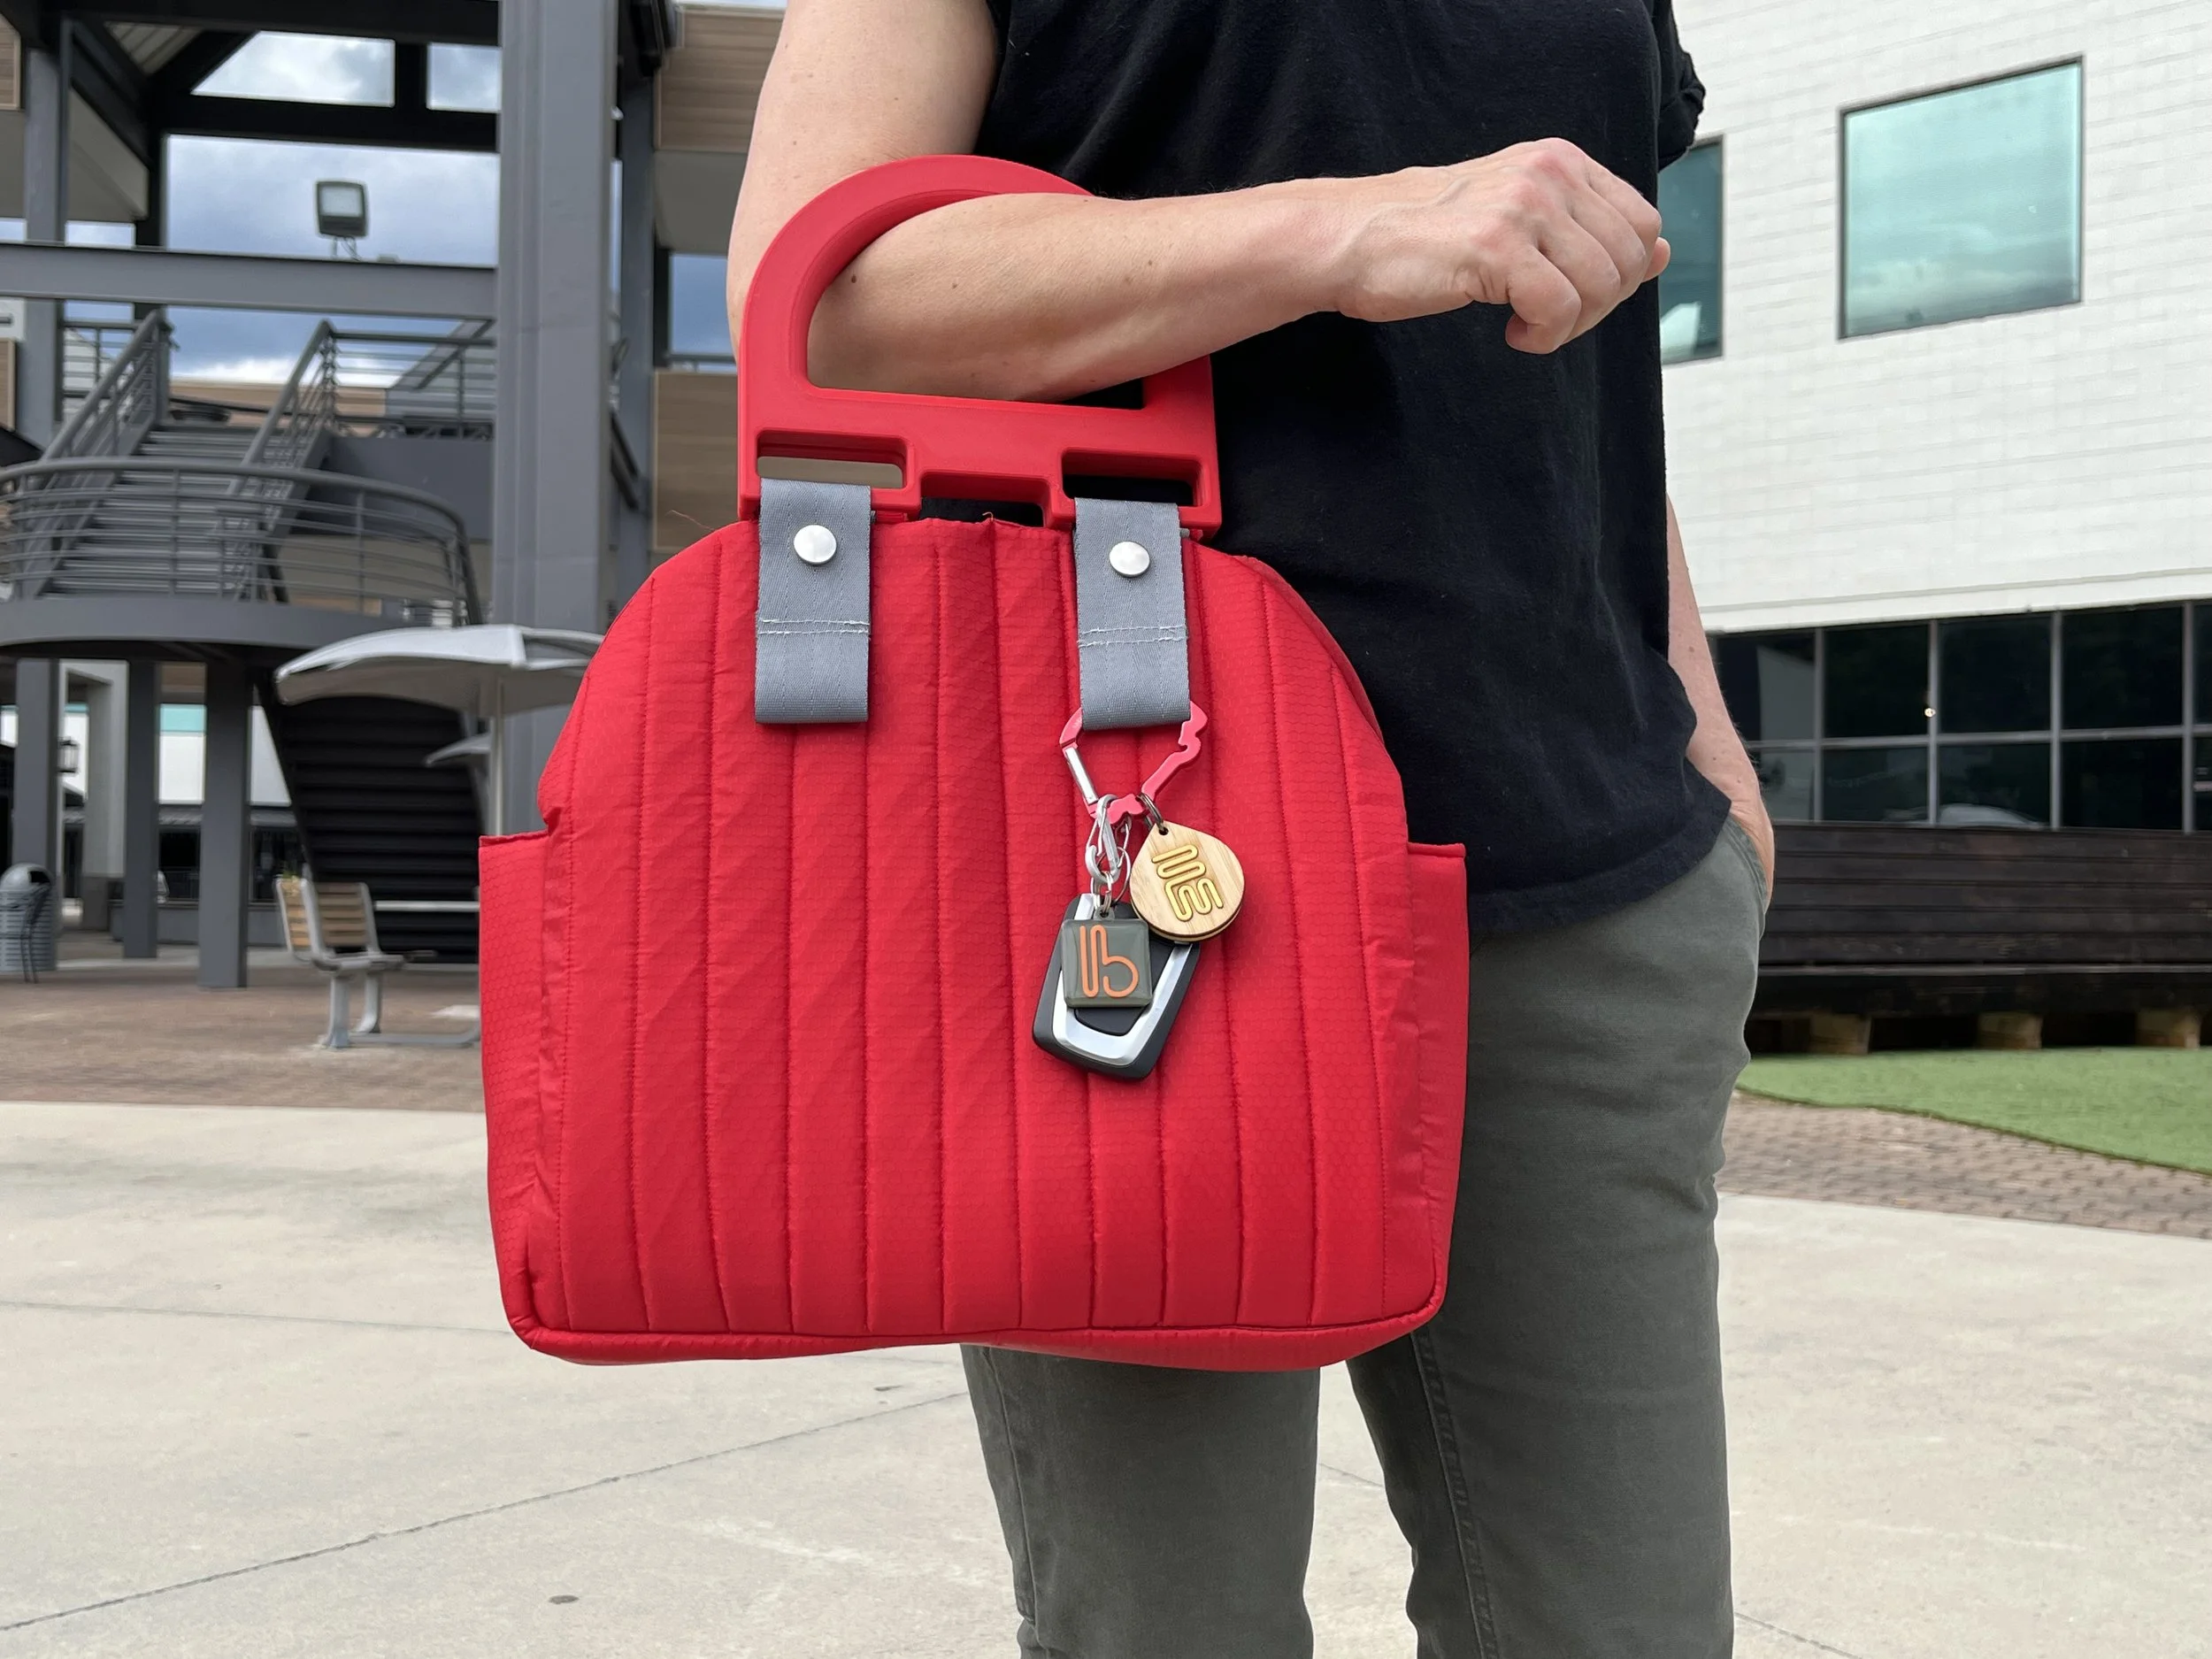
Prototype 1
Explored configuring the handle attachments as loops, securing the handles to the bag with a set of snaps. This would allow someone to remove and replace the handles; opening up the possibility of a modular bag system.
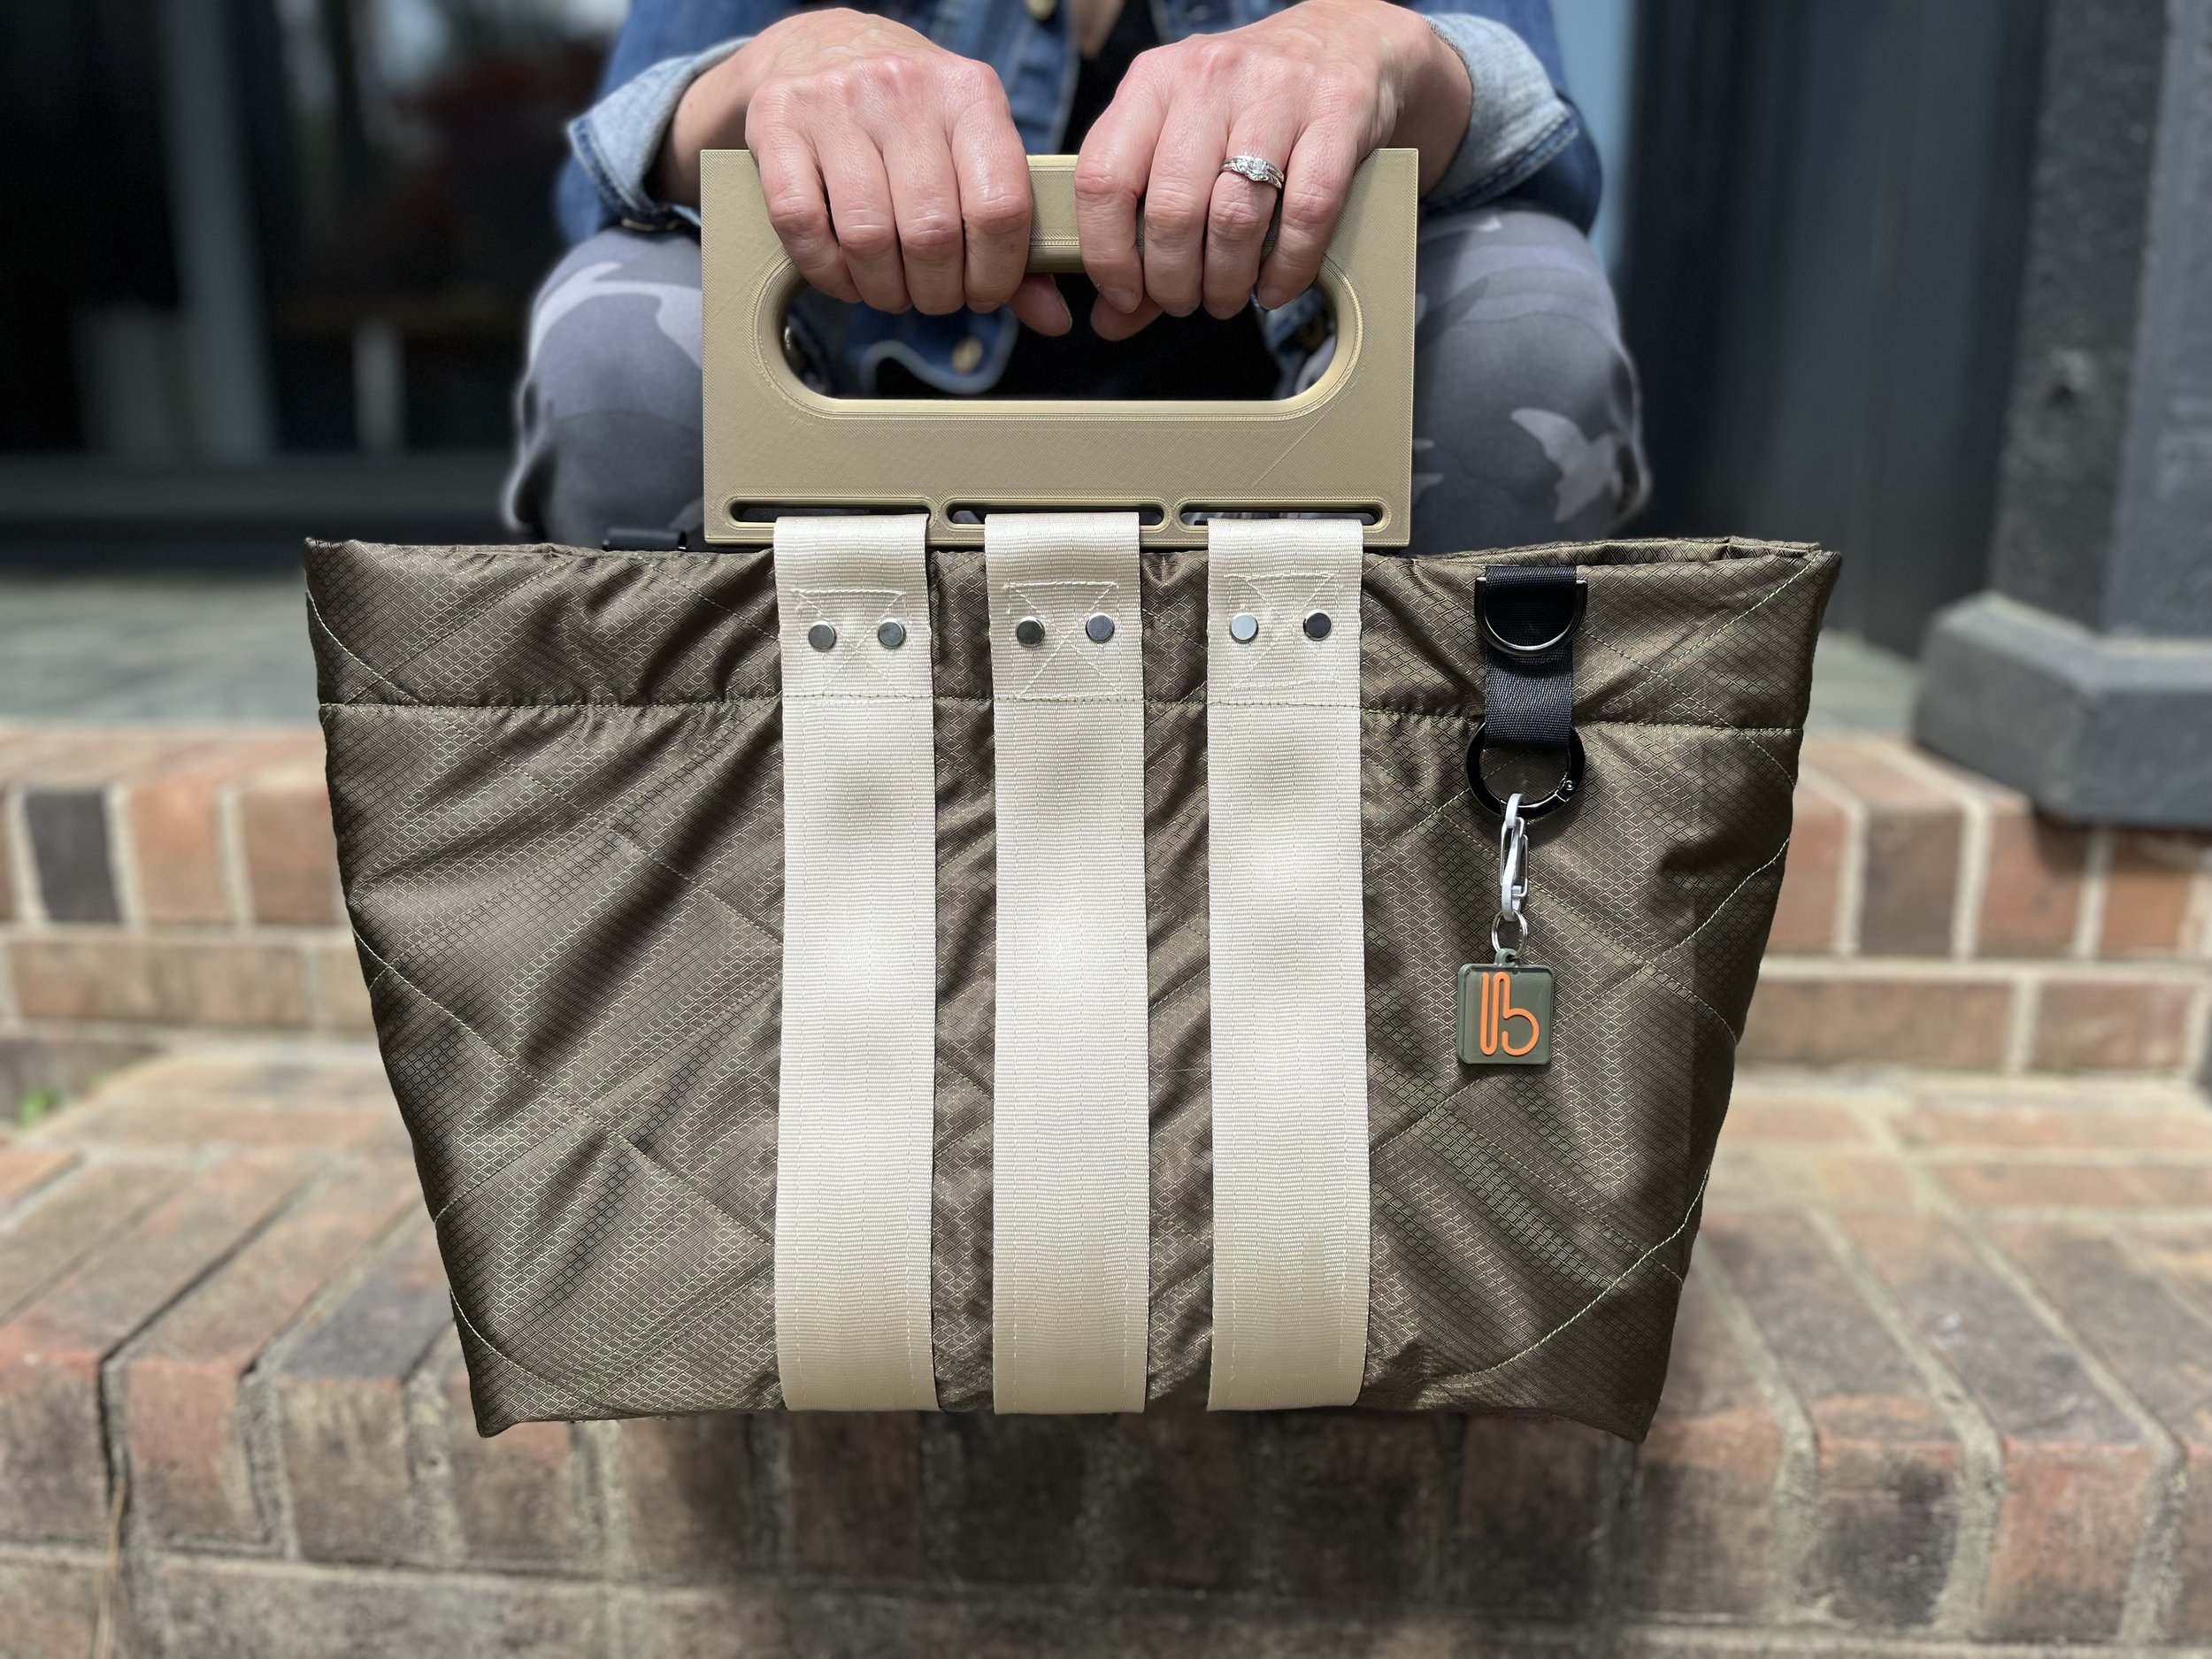
Prototype 2
Has 3 narrow cut outs the size of the seatbelt webbing we used. We used rivets to secure the webbing to the bag, once threaded through the handles.

Prototype 3
A long narrow cut out is at the bottom for the material pass-through to attach the handles. Here we cut cork into straps, sewing an internal pocket to the end & sliding this through the opening. Rivets secure the cork to the purse.

Embedding Magnets
So the coolest thing about 3D printing your purse handles is taking advantage of embedding magnets. This gives you a clean, flat surface, when the handles are closed and makes it easier to carry the purse around in your hand. They are also durable for such a high-use part of the bag.
Once we realized how well the embedded magnets worked when closing our bags, we explored the potential of replacing tube inserts used in material handles with magnetic inserts.

This would maintain the uniform appearance of a softer material bag yet give the handles some serious stability and longevity as well as the magnetic closure function.


When thinking through the practical use of these handles it was at this point that magnet strength came into consideration. There needed to be a strong enough attraction between the magnets so that they held together even with the load of a full bag; but could still be comfortably and easily pulled apart to open the bag.
The first stadium-shape handles used a series of disc magnets, which we found didn’t have as much holding power as just a couple of pairs of long rectangular magnets did, so we began using those in subsequent prototypes.
Conclusions and Recommendations
What we learned and some suggestions we have

3D printing your bag handles can allow you to do quick prototyping of a unique design
Add embedded magnets to explore alternatives to bag closures and improved comfort in carrying the bag in your hand
As well as showing us the potential to design alternatives to what’s in the market today without compromising strength or durability

We did learn that the larger the bag, the heavier it will get, so we can’t just rely on the magnetic handles alone to keep the purse closed.
Adding a magnetic closure or zipper to the top of the purse along with the magnetic handles will provide the security needed to keep the bag closed and comfortable to carry.

What can’t be stated enough is the importance of prototyping the handbag with the 3D printed handles attached and taking it on several test runs around town. It helped us learn about the ideal size of the handle openings, how to adjust the magnets, and understand how to refine the handle design.
Interested in exploring 3D printed bag handles yourself? Sign-up today and we’ll let you know when they are ready!
-
If you are interested in what we used for this project, you can find our materials below.
Hardware:
Digital Calipers
Cloth Measuring Tape
Bambu X1 Carbon
Bambu Textured Plate
WhamBam 258 x 258 Flexi Plate with Pre-Installed PEX Build Surface
Software:
Shapr3D Version 5.590.0 (6756)
Bambu Studio 1.8.4.51
Materials:
Red, Olive Green, and White ripstop
Various colors of canvas material for linings
Pellon 808 Craft Fuse
Pellon 971F Fusible Thermolam Plus
2” wide Cream & Gray Seatbelt webbing
Cork material
Double-cap Rivets
5/8” Heavy Duty Snaps
Red, Olive Green, and Purple PLA
Reference Guide: